PCC TCN Instructions for setting up and using CyberDuck to upload images to CyVerse.
Printable version of these instructions
These instructions have three parts:
Part A: Getting set up with CyVerse and Cyberduck (one-time process)
Part B: Uploading your images to CyVerse
Part C: Mapping your image URLs to your specimen records within the Pteridoportal
Part A: Get access to CyVerse and install Cyberduck:
- Obtain a CyVerse account
- Create a CyVerse account at https://user.cyverse.org
- Once your account is set up, request access to the BisQue Image Server: https://www.cyverse.org/bisque. You must do this in order for your image to appear online! To check if you have BisQue access, click on the Services tab while you are logged into CyVerse. You should see BisQue listed under My Services.
 If you do not see BisQue listed, click on the Available tab. Find BisQue on the list, and click on the Request Access.
- The PCC CyVerse Administrator will set up a folder for your institution within the CyVerse PCC_TCN folder. Send Joyce Gross (joyceg@berkeley.edu) and Amy Kasameyer (akasameyer@berkeley.edu) an email with the following information
- The name of the collection for which you will be uploading images
- The first and last names and CyVerse account names of the people who created CyVerse accounts at your institution. They will be given the proper permissions to access your CyVerse folder.
Important: If you will be uploading images for multiple collections, each collection will need its own folder within the PCC_TCN folder
- We will be using the open source software Cyberduck to upload images to CyVerse. For more information about Cyberduck and CyVerse, see https://wiki.cyverse.org/wiki/display/DS/Using+Cyberduck+for+Uploading+and+Downloading+to+the+Data+Store
- To install Cyberduck, download the software from https://cyberduck.io/ and follow the instructions for the installer.
- Once it is installed, open Cyberduck
- Now you will need to configure Cyberduck to connect to CyVerse. See step 2 of the instructions at https://wiki.cyverse.org/wiki/display/DS/Using+Cyberduck+for+Uploading+and+Downloading+to+the+Data+Store to download the CyVerse Connection Profile
- Open the Connection Profile and make the following edits:
- At the top dropdown menu, iPlant Data Store (on a mac) or Cyverse Data Store (on a PC) should be displayed
- In the iPlant username field, enter your username
- Verify that 1247 is entered in the Port field
- Enter /iplant/home/shared/pcc_tcn/XXX in the Path field. XXX is the name of your folder for your collection
- Under Transfer Files, select Open Multiple Connections
- Close the connection profile window
- If prompted, enter your CyVerse password. You should now be able to connect to your folder in CyVerse.
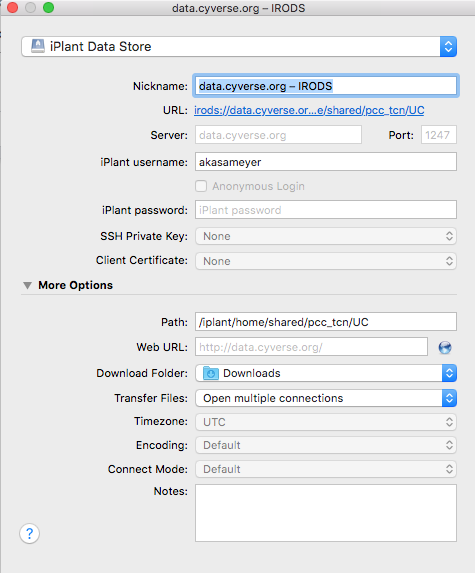
Example of connection profile bookmark for UC. Replace UC with your collection folder.
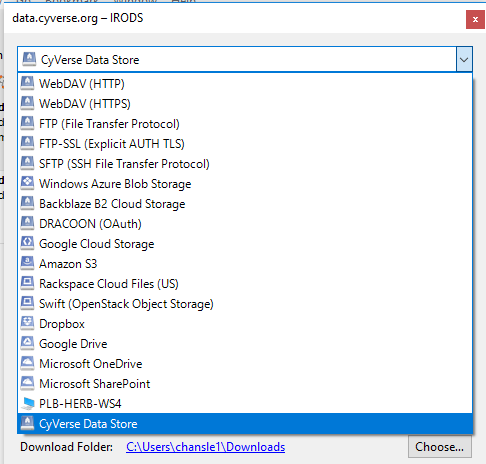
Note, if you are using a PC, you should choose CyVerse Data Store instead of iPlant Data Store as shown in the following image:
IMPORTANT: For this project, we are only uploading JPEG images to CyVerse. Please do not upload TIFF, DNG, or RAW files to the PCC_TCN directory on CyVerse. Target size for JPEGS is 4-6 MB.
For your first batch, do a test batch of 5 images. Once you have uploaded images and confirmed that they are successfully linked to your records in Symbiota, with Joyce and Amy, you can begin uploading larger batches of images.
Image uploading tips
- Before uploading, put your images in folders labeled with the date you plan to upload them, (“2019-08-30”). Do not put more than 2000 images in each folder! Uploading larger batches may cause problems.
- Verify that you have access to BisQue (See Part A) before uploading images.
- Before you upload your files, verify that the images have the correct orientation. It can be challenging to replace mages in CyVerse, so verify that images are correct the first time.
- Double-check and triple-check that you are uploading the correct images! If an incorrect batch is uploaded, we have to request that CyVerse deletes it.
- Open Cyberduck.
- Double click the data.cyverse.org bookmark that you set up in Step 3.
- Enter your CyVerse password.
- Once connected, you should be able to see your collection’s folder within the PCC_TCN directory. Always confirm that you are uploading your images to the correct folder! Make sure the correct path to your folder is displayed in the window.

- Under the Action menu, select Upload.
- Select your folder of images you wish to upload, and click Upload.
- When the uploaded has finished (this may take some time), disconnect from the server by clicking on the Disconnect button in the upper right.
- If desired, verify images in the BisQue image client. You will only be able to see your images on BisQue if you have already logged in to BisQue before uploading to activate your account.
- Go to https://bisque.cyverse.org and login with your CyVerse account details if needed.
- Under My recent stuff, click on the Images tab. Here you should see your recently uploaded images.
Reminders and Tips:
- Store images to be uploaded in batches of 2000 images or less per folder. You can make as many folders as needed. It is recommended that you use the date of capture or date uploaded for the folder title, in the format YYYY-MM-DD. If you are uploading more than one folder of images per day, append a date stamp or alphabetically suffix to distinguish the folders.
- Please only upload JPG files and double check that your files are around 4-6MB in size.
- Please check that your images are rotated correctly and named correctly before uploading to CyVerse. Deleting, moving and renaming files is difficult in CyVerse, so we want to make sure we upload good images the first time.
- Your institution may have limitations on how many files you can upload at once. Do some tests to make sure all of your images are being uploaded.
Part C: Map the image URLs to specimen records within the Symbiota portal using the iPlant image mapping tools available from the Processing Toolbox.
Note: Test this process out with your first batch of 5 images to confirm everything is configured properly. If the images do not load, contact Joyce and Amy.
These instructions are for uploading images to the Pteridoportal. If you are uploading images to a different portal, such as SERNEC or the Midwest Herbaria Portal, talk to Joyce and Amy for more instructions.
For collections with live data in the Pteridoportal:
- Login to the Pteridoportal, go the Control Panel for your collection, select Processing Toolbox, click the Image Loading tab. In the Saved Image Processing Profiles box, select the iPlant Image Processing (VT) profile (VT example; your iPlant profile is likely to contain your own institution code).
- Processing Start Date: The first time you run the Image Loader, the Last Run Date will be set to “no run date”. Set the Processing start date to the date you first loaded images to CyVerse. If you have a question, contact us. Subsequently, once you run the Image Loader, the Last Run Date and the Processing Start Date should automatically set to the date the loader was last run. This will ensure that only new images added since you have last run the Image Loader will be mapped.
- The first time you run the Image Loader, you may need to set up the Pattern match term. Joyce and Amy can help you with this if needed. This expression allows your images to be linked to the corresponding records in Symbiota.
- Click on Process Images.
- Check the log file to confirm that the correct number of images were loaded.
- If you upload a batch of images to CyVerse and they do not get mapped to your records in Symbiota when you use the Image Loader, try running the Image Loader again the next day. This will usually solve the problem. If it doesn’t, contact Amy and Joyce.